

7 Cool Raspberry Pi Projects For You
The world of computing is immense and it opens up new possibilities every single day.
With this in mind Raspberry Pi has become a well-established hit among beginners and enthusiasts looking to up their skill set. For those wishing to dive headfirst into this, it’s time to look at 7 cool Raspberry Pi projects anyone can start with to get the hang of things! If you would rather look at the best Raspberry Pi kits we have a section for that too!
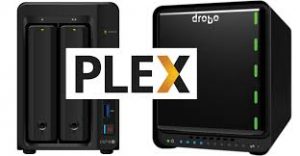
Project #1: Building Your Own Plex Server
The Plex media server has earned critical acclaim for its accessibility and value when it comes to movies, music, and photos all in one place. However, what if you were able to build your own server with a Raspberry Pi?
Here’s what you need to do.
Start by acquiring the following items: Raspberry Pi, Power Supply, Micro SD Card, and Ethernet Cord (WiFi Dongle is acceptable too)
1) The first thing you are going to do is install Raspbian at https://www.raspberrypi.org/downloads/raspbian/. This is going to help set the foundation for what has to be done here.
2) Once Raspbian is in place, you’re going to activate your HTTPs transport package. This is necessary for the Plex media server to function.
3) At this point, you will want to focus on the command output by adding a new crypto key (found at Dev2Day.de).
4) At this stage, you are now ready to install the Plex media server since your Raspberry Pi is ready to go. Do this by opening the following file – Plex Media Server file through Raspberry Pi.
5) You will have to adjust the user settings by switching Plex to Pi.
6) Now it’s time to make the final tweaks and this starts with the IP address. You want it to stay static to avoid performance issues and this can be done by typing “hostname -I”.
At the same point, you will want to open the following file – “cmdline.txt”
This file is going to help initiate the IP address and ensure it is yours once you type – ip=YOUR IP (make sure you put in your IP in that spot!)
There you go, the Plex media server is now ready to go and work the way you want it to! Start by going through the media server and uploading different files as you please. This will allow you to test the options made available to you. Remember, the Plex media server is all about customization and you will have to play around with the settings to get it right.
Otherwise, the files aren’t going to be in one place and may not be organized as you want them to be! Spend a few minutes on this process, so the accessible Plex media server is worth your time over the long-term.
Project #2: Wireless Printing
When it comes to the 7 cool Raspberry Pi projects, this is a unique one and simple at the same time.
To get started, please have the following items ready to go – Raspberry Pi, Ethernet Cord/Wifi Dongle, and Micro SD Card.

1) You will start by installing Raspbian through the official Raspberry Pi website. This is a must.
2) Now it is time to set up CUPS, which is a well-designed software solution for the management of different devices on the same network (i.e. printers). To do this, you will type “sudo apt-get install cups” as a command.
You will also want to change the settings so you are the official admin for CUPS by typing – “sudo usermod -a -G lpadmin pi”
3) Make sure the IP address is accurate so you are able to tap into any printer as you please! Do this by typing the following command – “hostname -I”
4) You should be able to access the printers by typing the following now – http:/Your IP
As soon as you do this, a separate screen will pop up that is going to allow you to add new printers. Go through the steps and your Raspberry Pi will become a printer hub that enables wireless access as you please! It’s that simple!
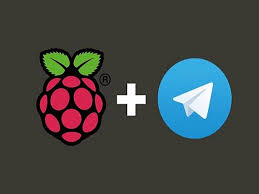
Project #3: Raspberry Pi Telegram
Telegram is popular and it’s never a bad idea to have wireless access to your Raspberry Pi using it! Let’s see how you can make this happen at home.
To get started, you will require the following items – Raspberry Pi, Ethernet Cord/Wifi Dongle, Power Supply, and a Micro SD Card.
1) Begin by setting up Telegram and do this with the help of the LUA interpreter. This is designed to know what is coming and going on Telegram as it will help automate the Raspberry PI later on.
You are going to want the scripts to be in place well in advance. This is your foundation for the project!
Begin by setting up the following commands – “cd ~/tg nano actions.lua”
2) You will have to start making tweaks to the Telegram in a bid to ensure everything goes through with creating unnecessary warnings.
You will only want it to ping at certain times and for this to happen appropriate commands need to be set up.
The first one would be:
“function on_our_id (id)
end”
Please note, each one is important and shouldn’t be skipped over in a rush! You have to implement them properly for good results. Otherwise, the pinging isn’t going to come across as you want, which gets in the way of the Telegram’s features. There has to be a clear connection between the Raspberry Pi and your Telegram account, which is only possible with these commands being set up as soon as possible. Go through each detail and then start the testing process right away.
3) Now it is time to start working with the Raspberry Pi for building your connection.
“cd ~/tg
bin/telegram-cli -k tg-server.pub -W -s actions.lua”
Start playing around with the Telegram account to see how it responds. Does it ping at the right times? Does the Raspberry Pi pick up the messages that are going back and forth? If yes, you will have done the hard work and now it is time to start testing with photos! Play around with the messages and make sure this connection is intact with different scenarios.
Project #4: Raspberry PI Storage (MACs Only)
Yes, the Raspberry Pi can be used as a way to store information as long as it is coded in the right way. Here’s what you need to do!
1) Begin by installing the appropriate software and this is done with the file sharing service (Netatalk). This is readily available online and is a must during the installation process or you will not be able to move forward as necessary.
2) Once the installation goes through, you will be able to play around with the filesystem on Pi. This is necessary to make sure the connection is in place properly.
3) Connecting the USB storage device will lead to a link between both the Raspberry Pi and stored files. You will want to make sure everything is formatted for the Raspberry Pi to pick it up.
At this point, you will be able to back up all information straight to the Raspberry Pi as long as you go through the Mac first. This means back up any file and it will directly go to the Raspberry Pi as intended!
Project #5: Extend Range of Wifi Network
Ever wanted to extend the range of your Wifi network at home? Well, it is time to put the Raspberry Pi to the test!
To get started, you will require a Micro SD Card, Raspberry Pi, Wifi Dongle, and Power Supply.
1) Begin with a simple command to make sure everything is ready to go. This will access the “hostapd isc-dhcp-server”.
You will also want to set up a separate manager (IP Tables) for the process! This is key for the server to work!
2) Create a DHCP server for the process
You will do this by typing “sudo nano /etc/dhcp/dhcpd.conf” as this will launch the process.
If there is anything similar to “ns1.example.org” in the coding, you should make sure there is a “#” sign added to the front. For anything that already has a “#” sign, please remove them!
Type “sudo nano /etc/default/isc-dhcp-server” to run the server and then the following line – “INTERFACES=”wlan0”
3) Create an access point
You will need an access point for the extended range and this is done by typing – “hostapd.conf”
At this point, you should be good to go, however, you are able to make additional adjustments later on if multiple users will be using the same extension.
Project #6: Raspberry Pi Music Player
With the top 7 cool Raspberry Pi projects, it’s best to look at playing a bit of music for those who love to listen to their tunes properly.
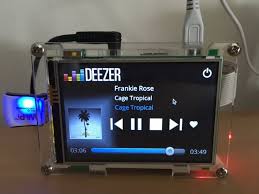
1) Begin by installing RuneAudio for the Raspberry Pi. This is mandatory.
2) You will want to extract the installed files straight to a Micro SD card while ensuring it is not set to be “WRITE ONLY” as that won’t work.
3) Make sure to turn on the Raspberry Pi at this point and make sure it is ready to go for the purpose of using it as a music player.
This starts by using a USB DAC that is going to set up with the device. You are also going to plug in the Ethernet cord at this point. At this point, you can power on the device.
4) Open by typing the following command – http://runeaudio
This should ensure you are able to get to the desired playlists on your account all in one place. It is a great starting point and will allow you to tweak around with what is in front of you!
Project #7: Raspberry Pi Wireless Microphone
The idea of having a wireless microphone is unique and most people want to have on in their possession. However, it is best to make use of the Raspberry Pi for this purpose due to the results it is able to offer. Whenever you need a wireless microphone to record audio, you will be able to take this out and put it to use in a matter of minutes. In fact, it is also going to store the files in one place, so you are able to access them whenever you need to!
This is why it is a wonderful beginner’s project and will offer tremendous value over the long-term!
To get started, you will want the following items right away – Raspberry Pi, Ethernet Cord, Wifi Dongle, Power Supply, Micro SD Card, Speaker with Amplifier, FM Receiver, USB Microphone, and FM Antenna.

1) Download the Python script for the audio transmission.
Unzip the file and start by working on the 100 MHz tune on the Radio app by typing “sudo ./pifm sound.wav 100.0”
2) Turn off the Raspberry Pi and connect your USB Microphone.
At this point, you are going to turn it on and watch as the Raspberry Pi picks up on it immediately.
3) You will want to make sure the FM Antenna and USB Microphone are in sync once installed.
You should be able to get it to work at this point, but it’s always smart to make adjustments based on your USB microphone. This can include volume and other similar settings within the unit itself. Play around with these settings and get things to work the way you want them to! You will notice the music player is going to work the way you want it to when everything is personalized down to the volume settings. This is why you must toggle between settings before letting it work on its own!
Final Thoughts
There you have it!
These are the 7 cool Raspberry Pi projects anyone can pick up on as a beginner. Take your time and make sure the Raspberry Pi brings real value to your life in a matter of minutes!